2.2) Processing Data with PIA - A Guided Tour
This chapter serves as an aid to guide you through a PIA sample session step by step. The emphasis is on the overall sequence of the steps and their connection, therefore details of the processing and interface at each step are described only as far as necessary. For a detailed description of the interface and possible actions at each of the steps, please refer to the material on the windows (chapter 3) or processing (chapter 5) in this manual. Note that the PIA graphical user interface generally offers several options for which data reduction steps can be performed at any given time. It is also possible to display intermediate results of the current reduction at any time, or to reduce several observations simultaneously. However, a straightforward reduction of an ISOPHOT observation can, in general, be performed as a standardised sequence of steps.The reduction of ISOPHOT data with PIA consists of the following overall parts:
- Start PIA.
- Select data, i.e files (OLP files in FITS format, internal PIA produced files in IDL/XDR format), or already read data residing on internal memory.
- Analyse and process the data. There are two kinds of data:
- Fine Calibration Source (FCS) Data used to determine the actual detector responsivity.
- Astronomical Data (i.e. source, background, dark current, straylight)
- The FCS Data should usually be reduced first.
Some Preliminary Notes
Installation and Set-up: We assume that PIA is already installed properly on your account. If this is not the case please refer to Appendix D - Installing the PIA Software.Note that the filenames on the CDs are not according to the conventions for the pipeline and PIA. They are split into a directory part named after the TDT+OSN number and a file name part, this is because of the restriction of the ISO standard under which the CDs are written. You will need to ensure that your data have been renamed according to the standard file naming conventions (consult the PIA Homepage: http://general-tools.cosmos.esa.int/iso/manuals/PHT/pia/pia.php for filenames converters). You will probably find it more convenient if the raw data files corresponding to one proposal are all stored in the same location on disk.
Hints:
The UNIX window from which you launch PIA serves as a message output console for PIA. This console will be running an IDL session. Its last line should be visible all the time (and not be hidden by other windows). Particularly at the beginning you may need to watch it in order to see whether PIA performs actions and which problems arise. From PIA V7.0 on a new IDL feature is used, which makes it possible to use this window as a command window. Because of this you don't need to leave PIA for executing IDL commands, or even PIA commands, which can be sent from the command window (details on accessing PIA buffers are given in 'Advanced PIA use - ...')
In the case of a crash you may refer to the apppendix F on trouble shooting in this manual for more detailed information. In many cases, however, it is easy to continue the session without loss of data.
Conventions:
In this guided tour, clickable buttons on the interface and items to be selected from menus and their submenus will be shown in bold, fixed typeface. A submenu often appears when a main menu button is pushed (clicked on with the mouse).
Starting PIA
Now let us start PIA:- Since PIA V6.1 there exist command files / shell scripts for starting
PIA both on VMS and UNIX. You just need to run them to start an IDL session
with the corresponding startup file, including all necessary system variables
definitions. For more details please refer to the appendix D, Installing
and configuring PHT Interactive Analysis System.For system-wide installations
we recommend to place a link PIA in a common place to the shell
script PIA.
Then you will see a window entitled: Welcome to PIA, with information about the development of PIA. Click:
Acknowledgedin this window and the PIA Top Window (section 3.1) shown in Figure 1 will be displayed.

Select Data
One basic feature of PIA is that the programme works with "the buffer"; temporary internal storage in IDL. For PIA this buffer is actually splitted into several buffers, one for each reduction level (e.g., the ERD buffer, the SRD buffer, etc.). The data are stored in the appropriate buffer at each level of data reduction and remain in memory until PIA is exited or the buffers are explicitly deleted. Each buffer can contain a number of observations from different input data files, so it is possible to process several files and measurements simultaneously or combine the results of different observations. The contents of a buffer can be written out to a data file per measurement if you want to retain them after the PIA session ends.If you have more than one observation, you will need to know the TDT (Target Dedicated Time) and OSN (Observation Sequence Number) of the observation you want to load into PIA; the rest of the filename can be reconstructed by PIA based on the level of data and detector. For example, PIA will find the file PPER01301401.FITS if you tell it you want to work on ERD for a PHT-P detector. The TDT+OSN number, here= 01301401 uniquely identifies the observation. The first 3 digits are the Revolution number, the next 3 digits a sequence number and the last two the OSN. the rest will be found by PIA. File name conventions are discussed in the Appendix E.
The data selection consists of the following steps:
- Set filetype and detector
- Select a file
- View the file header (optional)
- Read the file into the buffer
- Select a measurement within the file
- View the compact status for the selected measurement (optional)
All these steps can be performed interactively by using the Files Manager and the Buffers Manager:
1. Using the Files Manager and the Buffers Manager
From version 4.7 on PIA offers a compact way to access files and internal buffers:1. The Files Manager
Select the following menu and submenu from the PIA Top Window:A new window appears as shown in Figure 2.
- Files -> Files Manager
Basically the window is divided into three rows:
- The control row: it contains lists for choosing detector and level, file types and corresponding paths to be used.
- The files management area: it contains a number of selectable lists and buttons for identifying and reading a file or several files.
- The message box.
Control row:
- Select a File-Type and Detector (e.g. ERD and P1,P2,P3 as preselected):
- At the options "Select Files from":
Click explicitly with the left mouse button onto the selected items.
Choose option: Pipeline FITS
Then in the files management area the corresponding list of available files is displayed.
Note: The two alternative options "PIA FITS" and "Internal Save File" are for the reloading of your individually-stored intermediate results.
Files management area:Message box:
- Select a File (e.g. PPER01301402.FITS):
Click explicitly with the left mouse button onto the selected file.
- Press the action button: "Read File"
The selected file is then read into the buffer. (Note: it will be read each time the button is pressed, occupying new space in the buffer.)Note: There is also the option to read multiple files, which works as follows:
Select a file and then press the action button "Add file" (which appears by the multiple files option). The name of the chosen file appears in the list "Selected Files for Reading". After several selections press the action button "Read All" and all the selected files are read into the buffer. The possibility of adding all files of the chosen type at once int the selected files for reading is also given.With every file that is read into the buffers a message will appear confirming this action.
2. The Buffers Manager:
- It is also accessible from Buffers button in the PIA Top window, under
Buffers Manager. After pressing it, a new window will appear as shown in
the following figure:
FIGURE 3: The PIA Buffers Manager window
- The window is divided into three rows:
- The control box
- The buffer management area
- The message box
In the buffer management area, choosing both level of data reduction and detector leads to a list of corresponding measurements in the buffers. Clicking on one item in the list activates it for performing any action given by the control box buttons.
Now choose one of your measurements read from the FITS file and click on the button "Plot & Reduce Data", a new window (ERD window) will appear, starting the data reduction process.
Reduction of the ERD (to SRD)
The Edited Raw Data (ERD, the detector read-out values in V), are examined, corrected for artifacts and processed into the Signal per Ramp Data (SRD,the slope of each ramp in V/s).Both FCS measurements and astronomical data require the same procedure at this stage of data reduction.
When you have selected a measurement and chosen "Plot and Reduce Data", you will see the "PIA ERD Window" as shown in Figure 4:

FIGURE 4: The ERD Window for a P3 measurement
This Window is divided into three rows.
- The upper row contains some general control buttons and information.
- The middle row shows four plots with associated buttons above and below the plot which affect that plot.
- The lower row contains the menu buttons which perform the actual processing on the whole measurement.
Note: There is a slight difference in the way PIA displays information (when opening the main windows) for single pixel detectors (P1, P2, P3) and for array detectors (C100, C200, PHT-S):
For the single detectors the plots show four different types of information for the single pixel, while for the array detectors all plots show read-out values against time for different pixels. It is easy to modify the content of the plots, both the pixels displayed and the quantity plotted. For detailed information about these features please refer to the chapter ERD Window in the reference part of the PIA User Manual.
Let us have a closer look at the middle row of Figure 6 going from right to left: (Note that in this illustration the symbols are quite large, so neighbouring points tend to blend together; this will improve in the zoomed plots later.)
- The plot on the very right displays the temperature which is very stable during the measurement time.
- The next plot shows the chopper position. It is a triangular chopping with four chopper positions, the first and third at -60 and +60 degrees, the second and fourth at 0 degrees. Each chopper position is repeated four times.
- The second plot from left shows the digital data from the telemetry (DN), which is converted to analog read-out values (V) as shown in the...
- ... plot on the very left as raw data. The destructive read-out values and the first non-destructive read-out values are discarded by default and are marked with a cross. In general, data points marked this way will be discarded when the data are processed.
- Changing the contents of the Plots: The menu bar just above each plot allows you to change the content of the plot, e.g. read-out values/time or chopper position/time and so on. The descriptions indicate the content of the actual plot.
- Zooming in: The menu button "Zoom & Print" just below each plot allows you to inspect the plot in detail via the PIA Xplot Window (section 3.4.1). You can use the PIA_Xplot Window to zoom in on your data (choose "New") or to plot one type of information on top of another (Submenu "Overplot"). For example, to plot the chopper plateaux on top of the read-out values, choose PIA_Xplot with the "New" Option. Then display the chopper plateux and choose PIA_Xplot with the "Overplot, new y-axis" option ("Overplot, same y-axis" would re-scale the data to the chopper-plateau y-axis).
- Discard Read-Out Values:
- Correction for Saturation (Set allowed dynamic range):
- Correction -> Non-Linearity:
- Correction -> Read-Out Deglitching:
- Press the menu button "Correction" choosing "Read-out deglitching" from the submenu. This will perform the deglitching using the current (default) parameters and refresh the plots in the ERD Window. Note that the primary effect of read-out deglitching is to flag affected points by glitches so that ramps can be repaired, which suffered a discontinuity due to cosmic rays.
- You may now press the menu button "View" and choose "Deglitching Statistics" to see how many glitches have been corrected for (in each pixel).
- Choose a raw data plot to work on and press the menu button "Test processing", choosing "Test deglitching" from the submenu. The "Test processing" button is the righthand button just below the plot.
- Modify any of the editable parameters in the I/F. Then press the button "OK, test them", and the read-out deglitching will be performed on the pixel you selected and the result shown in a new PIA Xplot Window and in a PIA Text Window. The points recognized as glitches will be flagged. Depending on your choice the ramps will be reconstructed or not. An example for reconstructed ramp is given in Figure 5. Please note that the found glitches are marked.
- At this point the new parameters are only applied for test. If you actually want to use these new parameters to deglitch the (whole) measurement, press the button "Accept & Quit". This replaces the default deglitching parameters with the new ones until you choose "Accept & Quit" again or until you exit PIA. To actually perform the deglitching on the whole measurement with the new parameters, press the menu buttons "Correction" and "Read-out deglitching".
Press the menu button "Selection" (submenu "Discard Read-Outs"). This brings up the Read-Out Selection Window which is used to flag selected read-outs to exclude them from further processing. If you like, you can modify the parameters to see the effects.
The correction for saturated read-outs (i.e., discarding them from further processing) is always active and performed automatically. The data which will be discarded are marked with red crosses in the plots. If you like, you can modify the parameters to see the effect:
Press the menu button in the lower row labeled "Correction" and choose "Change Saturation Parameters" from the submenu. This brings up the simple menu to set the voltage range which will be retained in further processing.
Note that the voltage range used should also be noted, i.e. whether
the read-out values make poor or good use of the available dynamic range.
Poor use of the dynamic range in the data may account for a high noise.
Press the menu button "Correction" (submenu "Non-Linearity"). The raw data in the ERD file which is displayed will be corrected for the non-linearity of the detector response using special calibration files. The plots are updated to show the corrected data. The correction is applied only the first time this correction is selected for a given set of data. The algorithm that is applied is identical to the PHT pipeline non-linearity algorithm and uses the same CAL-G files.
First let's try to deglitch by using the standard parameters:
FIGURE 5: Ramp Deglitching Example: The original read-outs are marked with diamonds and connected with a dotted line, the deglitched read-outs are marked with squares. There are two glitches, one at time 45.7 and one at 46.2 [sec]. The first and last read-outs are marked with crosses and discarded.
- Correction -> Two-threshold deglitching:
- View the Performed Operations:
- Save and Reload Intermediate Results:
- Process the data to Determine the Signal per Ramp:
Using a different algorithm for deglitching but using the same philosophy for testing parameters, storing and displaying statistics, etc. The algorithm is described in chapter 5.1, section "Two threshold glitch recognition".
You may wish to take a look at what operations have been performed on a given measurement; these are written into the header. To view the header press the "View" button at the bottom of the window and choose "Header". In the middle of the header you will find rows beginning with "pr", which contain the information about deglitching etc. You can view the header for any level of reduction of the data; the relevant header lines concerning processing by PIA begin with "pr_" for ERD level, "prs" for SRD level and "prc" for SCP level.
If you want to save your de-glitched and linearised ERD, press the menu button "Data" (choosing "Save"). "Data" is the button on the very left in the lower row. You can choose to save the data as a PIA Internal file or as a PIA FITS file. (Note that PIA FITS files are not exactly like the corresponding pipeline FITS files). Assuming you choose to store it as a PIA internal ERD file, you will create (by default) a file "P10401301401.IERD" in the directory PIA_SAVEDIR which was set up in the envi/logdef file. (The name corresponds to P1mm01301401.IERD with mm = measurement - 1, so this file corresponds to measurement 5). You can choose alternatively a different filename.
While working on a reduction level dedicated window (in this case the ERD level) the data are corrected for the different effects on a temporary data structure, which can be used for further reduction, as explained below. The data in the internal buffer, however, remain unchanged. If you want to keep in the buffer corrected data on a certain level you should choose the option Save -> to ERD (SRD, SCP, ...) buffer, overwriting the uncorrected measurement or creating a new position in the internal buffer.
(To reload the internal saved results follow the same procedures you used to read in the pipeline fits file you started with, except that you should select files from the category "Internal Save File". You should eventually arrive in the ERD window as before, but with deglitching already performed.)
Finally:
Press the menu button "Process Meas." choosing (for staring, P32 and any PHT-S measurements) "Fit Ramps, 1st order Pol." A new window will appear, the "PIA SRD Window", which has a design similar to the ERD-window. Two of the further options are fitting a 2nd or a 3rd order polynomial, both not recommended and only for test purposes. Another option for staring measurements is to use subdivided ramps. In this case the linear fits are performed to parts of the ramps, increasing the time resolution. This is of advantage for measurements with very long (and normally in this case, few) ramps.
From PIA V8.0 on, the default for chopped measurements (except for P32, which is a special case, and PHT-S observations), is to use the so-called "Ramps Pattern" procedure, as explained in the former section, under Description of the data reduction steps. However, chopped measurements can be reduced using the same procedure as staring measurements.
Reduction of the SRD (to SCP)
The Signal per Ramp Data (SRD, in V/s) are examined, corrected for artifacts and averaged to become Signal per Chopper Plateau (SCP, also in V/s) data.The SRD Window as shown in Figure 6 has a structure very similar to the ERD Window described in the previous chapter. Note that Figure 6 is for a C200 measurement and is therefore not exactly similar to the SRD Window which would follow from the processing of the P3 data shown in ERD Window in Figure 4.
Again there are 4 graphical windows, now containing the calculated signals in [V/s] with derived error bars. All general display features are as described in the previous chapter. Only the steps under the menus Selection, Correction, View and Processing are different, as they now refer to proceses performed on the SRD data type.
FCS measurements and astronomical data measurements are processed the same way at this level.

FIGURE 6: The SRD Data Display for a C200 measurement. Note the array pixel indicators in the upper right corner. You may also notice that there are some glitches present which were not removed by deglitching on the read-out level. They are marked with crosses because they have subsequently been de-glitched at the signal level as described below. You can also see the effect of detector drift.
Now let's reduce the SRD, concentrating, as before, only on the most important steps:
- Discard Signals:
- Signal Deglitching:
- Reset interval Correction:
- Dark Current Subtraction:
- Signal linearization:
- View Performed Operations or Save Intermediate Results:
- Process the Data to Determine Signal per Chopper Plateau:
- Stability Recognition:
- Slopes variations:
- Drift modelling:
Press the menu button "Selection" and choose "Discard Signals". A new window, the Signal Selection Window as shown in figure 7, will appear.
FIGURE 7: The Signal Selection Window
Under "Special Choices" you can enter values to select or de-select specific signals. For example, to discard the first 20 Signals, click in the box to the right of "From:" (just below the line reading "Discard Signals per Chopper Plateau:") and type "1". Then hit return, type 20 by the "To:" box, hit return, and finally, click on "OK" (just to the right of the "To:" box). The status note in the box just below the entries will be updated to reflect your changes. (Note: you MUST confirm each entry by pressing the RETURN key after typing it, otherwise the next step is not activated!),
To keep the selection criteria you just entered, leave the Signal Selection window, by pressing the "OK" button on the bottom line of the window. The plots in the SRD window will then be refreshed, with the de-selected signals marked by red crosses.
Note: In the case of array detectors the same selection
criteria are applied to all pixels!
Deglitching at the signal level can be performed by discarding signals, i.e. "whole ramps", selected on a statistical basis. Just as for read-out deglitching, you can customise the parameters for signal deglitching by using "Test processing" and "Deglitching". Just as before, the deglitching is actually performed for all pixels by clicking "Correction" and choosing "Deglitching". In general, data will need to be deglitched at both the read-out and signal levels.
The dependence of the signal obtained on the used reset interval for measuring it (a CRE effect) is corrected herewith. This correction can be applied also on the SCP level more efficiently, except for the case of "Ramp Pattern" reduction scheme, by which it has to be applied on the SRD level.
To subtract the dark current read from a standard calibration file press the menu button "Correction" and choose "Dark Current". This will actually perform the dark current subtraction. The subtraction can only be applied once to a given set of data, activating it again will have no effect. This correction can be applied also on the SCP level more efficiently, except for the case of "Ramp Pattern" reduction scheme, by which it has to be applied on the SRD level.
It accounts for the dependence of the detector response on the illumination. This correction should be applied on the SCP level, except for the case of "Ramp Pattern" reduction scheme, by which it has to be applied on the SRD level.
These options are discussed in the section on reducing ERD.
To obtain the signals per chopper plateau press the menu button "Process". If your measurement corresponds to a P or a C detector in staring mode (or in P32 mode) you have two possibilities: "no drift handling" and "with drift handling". [Chopped measurements have a further (default) possibility, the "Pattern procedure". PHT-S measurements are by default reduced using the "dynamic calibration". We discuss these cases further below].
Choose "no drift handling" if you do not wish to apply any drift recognition / modelling algorithm. In this case all valid signals which have not been discarded will be used for deriving the Signal per Chopper Plateau through their averages and medians.
Choosing "drift handling" offers you various possibilities, as given by the window "Drift Handling" popping up:
For all types of measurements PIA provides a stability analysis procedure (s. chapter 4) which identifies when the signal per chopper plateaux / raster point becomes constant within defined stability criteria. PIA then uses only the stabilized signals in subsequent reduction. In many cases there are too few signal data points for the analysis to be performed, according to the default parameter "Minimum number of points". Pressing the menu button "Test processing" and choosing "Drift Stability" you can change the "Minimum number of points" and the other parameters via a full graphical I/F testing how they would work if applied.
The drift recognition parameters you have chosen will be applied to the measurement when you process the data with drift handling -> stability analysis.
Conceived primarily for signal drifts assessment by PHT-experts, this analysis has been included in the general I/F. It looks for the variations of the slopes values in pre-defined time intervals within a chopper plateau / raster position. The signals per position are subdivided into the time intervals and then a first order polynomial is fitted to the signals comprised within each interval. The intervals have variable lengths, given through Delta(t_n) = [2^(n-1) - 2^n] seconds
Different theoretical and empirical models for signal transients can be used for approximating the signal distribution per chopper plateau / raster point, yielding a final signal value, which should have been reached by measuring an infinite time. The model you wantto use and its initial fitting parameters can be modified via a graphical interface which can be reached via the sub-choice Set initial parameters from the Drift Handling window. If this option is active, a menu is available which is a subset of the "Drift modelling" window (section 3.3.5) present on every PHTSRD individual pixel window under "Test processing -> Drift modelling".
A second sub-choice of Drift modelling, labeled "Use Post-Interactive mode", allows for accessing on an intermediate level (between SRD and SCP) all the information collected during the drift fitting processing. Inspection, analysis and re-processing of single pixels are then possible within a full graphical I/F comprising different distributions (Chi-squares, Residuals, Final Signals, Standard signals, etc, etc) for the best understanding of the fitting procedure applied and also for deciding on the acceptance or rejection of the fitted values. This window is described under "PIA Drift Analysis Data Display" (section 3.3.5).
PHT-P and PHT-C chopped measurements should be reduced by default
using the "Pattern" procedure. [This is only possible if they have been
reduced to the SRD level using already this recommended procedure (if not,
PIA will not make this option available)]. In this case, the signal losses
caused by transients induced by chopping with a certain frequency between
two different flux levels are corrected by special calibration files and
the result is an SCP containing one signal on source and one signal off
source, both corrected. Please note that the signal linearization correction,
which in all other cases should be applied on the SCP level, has to be
applied in this case on the SRD level before reducing further the data
under the "Pattern" procedure. Signal linearization requires the
reset interval correction and dark current subtraction to be performed
before. All three corrections have to be shifted in this special case therefore
from the SCP to the SRD level.
PHT-S measurements should be reduced using the "dynamic calibration",
as explained in section 3.3.8 for staring measurements
and in section 3.3.9 for chopped measurements.
Reduction of SCP Data (to SPD)
The average Signal per Chopper Plateau (SCP) data are further processed, e.g. by subtracting background and performing the power calibration to go from [V/s] to [W]. The resulting level is the so-called Standard Processed Data (SPD) level, which is the intermediate level of reduced data produced by the pipeline software.The SCP Window, shown in Figure 8, has the same general structure as the other data reduction windows and offers the same display facilities. This example is again taken from a single-detector, chopped (P3) measurement, processed with the non-default modus (alternative to the default "Pattern procedure").
For the first time at the SCP level, we now have to distinguish between two cases for which different reduction steps are required:
- Processing Fine Calibration Source (FCS) Data: The reduction at this level is different from that for astronomical data. The final step in reduction for FCS data occurs at this level, yielding the actual detector responsivity. (FCS measurements are not relevant to PHT-S data.)
- Processing Astronomical Data: Background subtraction and power calibration can be performed.
- Displaying Array Detector Data: an additional display facility becomes available for the array detectors and the PHT-S spectrometer. It can be accessed via the menu button "Array".
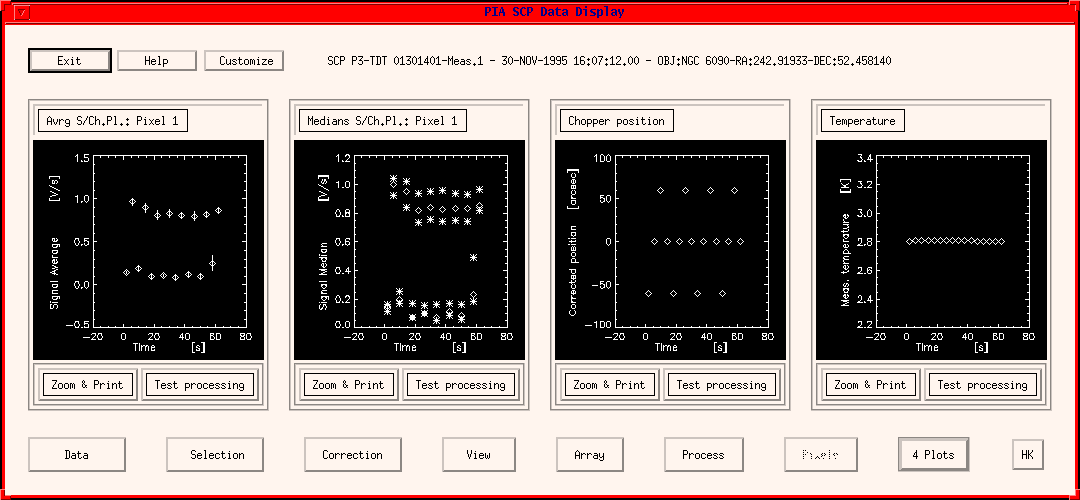
FIGURE 8: The PIA SCP Data Display
Let us consider Figure 8 in more detail:
- The first plot (on the very left) shows the average signal per chopper plateau. Note that the two signal levels corresponding to the source and the background are clearly distinguishable.
- The second plot shows medians and quartiles (in a PIA session using color, this plot appears clearer.)
- The third plot shows the chopper positions: The first and the third chopper positions are -60 and +60 degree off the center, while the second and the fourth chopper positions are on the center. Each chopper position appears four times.
- The plot on the very right shows the average detector temperature per chopper plateau; it is quite constant.
Now let's look at the "Array" display options, then let's reduce FCS data and, finally, reduce astronomical data.
1. Array Detector Data
Note that the array facilities are helpful for FCS measurements as well as for astronomical data made with an array.C100 and C200 Data:
- In the case of the PHT-C array detectors a "lego" plot of the array
[V/s] versus pixel will be shown. This can be helpful, e.g. to get an impression
of the flatfield of the current measurements. Note that the variation in
responsivity of the pixels often dominates this image. An example is shown
in Figure 9. Note that for a raster map the lego
plot is only given for one raster point; to obtain a map you have to apply
the mapping tool which will be explained later.
The lego plot can be modified (rotated or tilted) via the push-buttons. For a detailed description please refer to the section 3.4.3. on the PIA_XSurface Window.

FIGURE 9: Array Plot of C100 (showing flatfield properties)
PHT-S Data:
- For PHT-S data a spectrum can be displayed as shown in Fig. 12 in a
(2-dimensional) PIA_Xplot window for the first time. This can be done for
each chopper plateau.
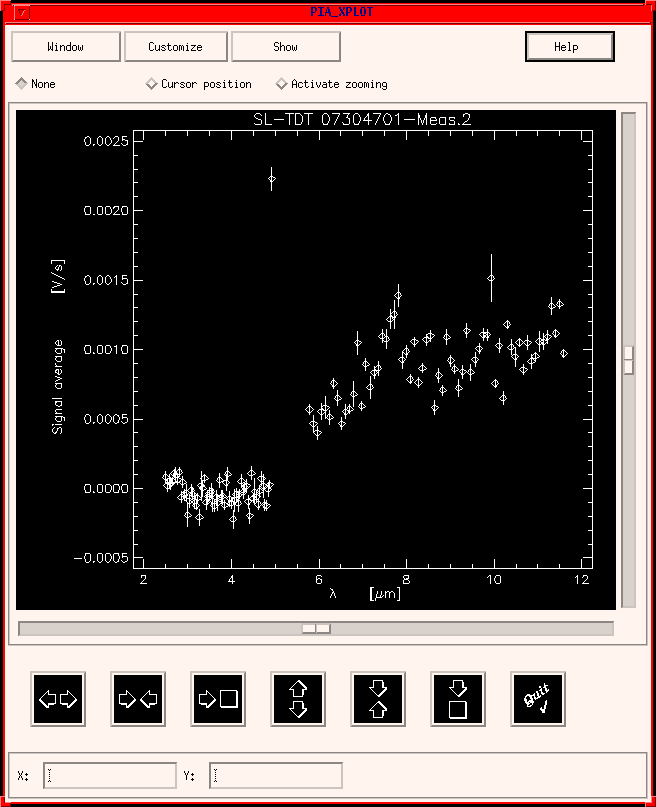
FIGURE 10: A PHT-S Spectrum on the SCP level
2. Processing Fine Calibration Source Data (FCS)
The detector responsivity varies by up to a factor of 2 or 3 on a time scale of hours to minutes. The actual responsivity at the time of the observation can be determined by an FCS measurement. The FCS has a known temperature and optical power output for a given heating power applied to it.This processing step calculates the responsivity of the detector pixels at the time the measurement was taken and displays it.
Note: FCS measurements are neither possible at the moment nor planned for the PHT-S data!
Now let's reduce the FCS measurement:
- Straylight Subtraction:
- Calculate the Responsivity (actual):
- Save and Reload Intermediate Results:
This is an optional correction. The FCS measurement may be contaminated by straylight from a bright source. Its contribution to the FCS flux is roughly estimated to be about 4%. However, this is a very crude estimation and should only be used in order to see how much influence straylight can have on the responsivity calculation.
If you want to correct for this straylight contribution, press the menu
button "Correction", submenu "Straylight correction". Select an on-source
measurement (already reduced up to the SCP level) from which the straylight
can be estimated and perform the correction.
Press the menu button "Process" and choose "Responsivity Calculation". The default and the computed actual responsivities will be displayed in a new window as shown in Figure 11.
Notice how large the differences between the actual and default responsivities can be! Click on "Accept as actual responses" to choose one of the options (average or median for FCS1 or FCS2 in the example) as the actual responsivity. Note that you will still be able to use the default values later in the calibration if you choose. Since the final flux is directly proportional to the responsivity, it is useful to print the responsivities and to mark the one used. With this step the reduction of FCS calibration measurements is finished.
Basically, we have now "loaded" the actual responsivity into the PIA
programme.
Note: To continue the reduction after a new start of PIA, you
have to reload a saved SCP file for the FCS measurement and calculate the
actual responsivity again in order to load it into PIA.
These options are discussed in the section on reducing ERD. Note that saving and reloading the SCP for the FCS measurement and then recalculating the responsivities is the only way to restore the responsivities for later use.
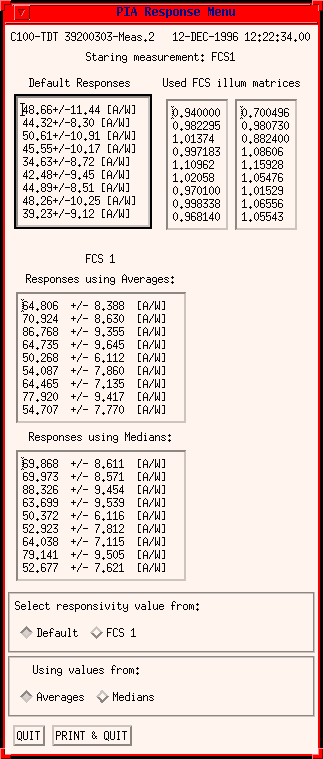
FIGURE 11: The PIA Responsivity Window. Note that for the array detectors this window displays n values instead of one. The same applies for the illumination matrices: They give the ratio how well the array pixel is illuminated by the FCS1 (left column) and FCS2 (right column). In the case of a chopped FCS measurement (FCS1 /FCS2), FCS1 is generally adjusted to the expected source plus background flux, while FCS2 is only adjusted to the expected background flux.
3. Processing Astronomical Data
We will reduce the Astronomical SCP data to subtract background and calibrate the signals (V/s) to in-band powers (W). Among the many possible actions we concentrate only on the most important ones:- Vignetting:
Press the menu button "Correction", submenu "Vignetting". This performs a correction for telescope vignetting according to data stored in a calibration file. This correction is optional -- it is important for measurements with large chopper throws, eg. P32 observations. Chopped measurements processed in the "pattern mode" do contain already the correction within their calibration, thus it should not be performed.
- Background Subtraction:
- From another measurement:
- Within measurement:
This step is optional and can only be used if either an internal (i.e. chopped) or a separate external background measurement (also reduced to the SCP level) is available.
To subtract a background press the menu button "Process" and choose
"Background Subtraction". PIA provides two alternatives:
In this case you must select the name of a background measurement which has been reduced up to the SCP level. However, when doing background subtraction from another measurement, it is better to perform the subtraction on the next level of data reduction (the SPD level, because the responsivity may be different for source and background measurement).
This is for chopped measurements, source versus background. Since there are normally losses caused by the subtracted value due to chopping between source and background, it is strongly recommended to run the correction labeled "Signal losses in chopped measurements" , if the default "Pattern processing" has not been used.
A new window appears, the "PIA Background Subtraction Window", as shown in Figure 12.
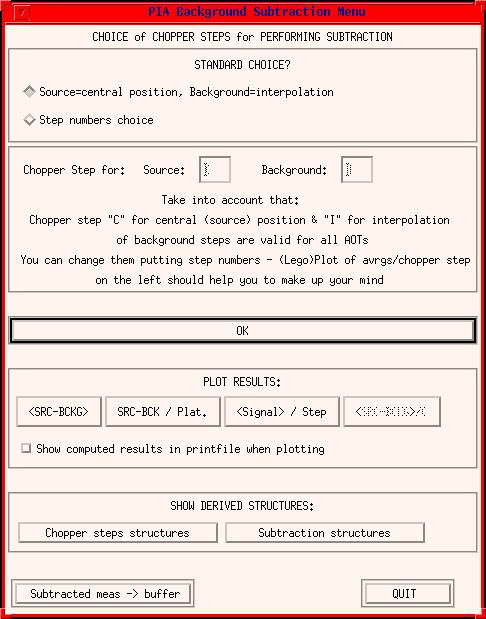
FIGURE 12: PIA Background Subtraction Window
- Define Chopper Steps for Source and Background: Accept the default: Source = "C", central position, and Background = "I", interpolation. (C means that the target is on the "central" chopper plateau, and "I" means that all the other chopper plateaux are for the background and that the background value which is actually subtracted from a target value is interpolated from the two neighbouring background values).
- Perform the background subtraction: Click on the "OK" button to the right of the Chopper Step selection row.
- Display the result: In the middle row press the menu button "SRC - BCKG" (Source - Background) and a new plot window will appear, showing the background subtracted signal.
- Write the result into the buffer: Press the action button "Subtracted meas. ---> Buffer". This step is essential; the measurement must be written to the buffer so it can be used for further reduction!
- Load the Subtracted Measurement:
- Power Calibration (+ flux conversion):
- The steps for background subtraction are:
Note: In the case of several chopper positions it is, in principle, possible to define which chopper positions are on the target and which are in the background. Some information about the signal levels at each chopper position is automatically provided by an additional Xplot (single pixel detectors) or Xsurface window (array detectors) and may be useful when making this choice. However, at this stage we will simply use the PIA default recognition as to which chopper step is on target and which is on background. Click on "Quit" to dismiss these plot windows.
We have now finished with background subtraction; click on "Quit".
Now the background-subtracted measurement is contained in the SCP buffer and we have to address/load it explicitly if we want to continue the reduction with the subtracted values. Press the menu button "Data" (submenu "Load") in the lower row of the SCP window and select the subtracted measurement which has the same name only with the suffix "subtracted".
Note: The PHT-S AOT P40 automatically provides a separate "dark current measurement" taken immediately before the target measurement. This dark current measurement does not represent the true dark current, rather it is dominated by long term memory effects. For example, if there is a memory effect on a given spectral feature from the previous target, this feature also appears in the actual target and will be evident in this "dark" measurement. It makes no sense to subtract this "dark current" from the spectrum, but it may be useful to overplot both measurements (spectrum and "dark") in order to get an impression of the influence of memory effects.
If the actual response is no longer loaded into PIA, or if you wish to choose alternative values, reload the saved internal FCS file (e.g."P10401301401.ISCP") as described above.
Now we convert the detector signal [V/s] into optical power [W] and into Flux [Jy] and Surface Brightness [MJy/sr]:
Press the menu button "Process" (submenus "Power Calibration/Actual Response") in the lower row. Of course you may also use the "default reponse" (and must for the PHT-S data).
Unlike the former PIA versions (< 8.0) this leads immediately to the "PIA AAP Window" (Figure 14), which is described further below. The AAP level is the one containing fluxes and brightnesses. The intermediate level (SPD) containing optical power in [W] is actually filled in the internal buffers, but will not be displayed, unless the user requires this using the Buffer manager. Keeping the SPD level makes possible importing files from the pipeline, which knows only the SPD as an intermediate level. The SPD level can be used as any other level for saving files, further reducing data, etc. Since it only contains a fixed flux conversion (and all other data reductions possible on the SPD level can be done on other levels) we just bypass it for practical reasons.
However, here the description of the related GUI:
The "PIA SPD Window" (Figure 13) is similar
to the SCP window. The plot windows in the middle row show the data; these
data correspond to the pipeline processing stage likewise called Standard
Processed Data. It is also possible to use this menu to display and analyse
SPD data from the pipeline by directly reading a pipeline SPD file into
PIA.
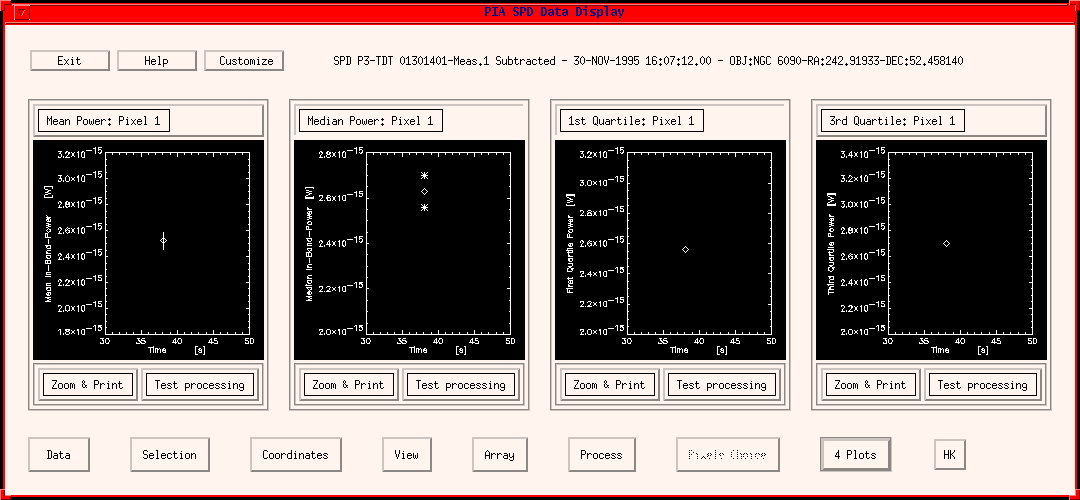
FIGURE 13: The SPD Window (corresponding to a P3 measurement)
Reduction of the SPD (to AAP)
The SPD level is further processed to the AAP level (Astrophysical Application, a level which is closely related to the pipeline product called Auto Analysis Results). The required operations are AOT-dependant. Generally, the flux calibration is performed. If there is a separate background measurement this can be subtracted from the source measurement.The AAP Window is shown in Figure 14. It offers the same principal display options as the other windows described in the previous sections.
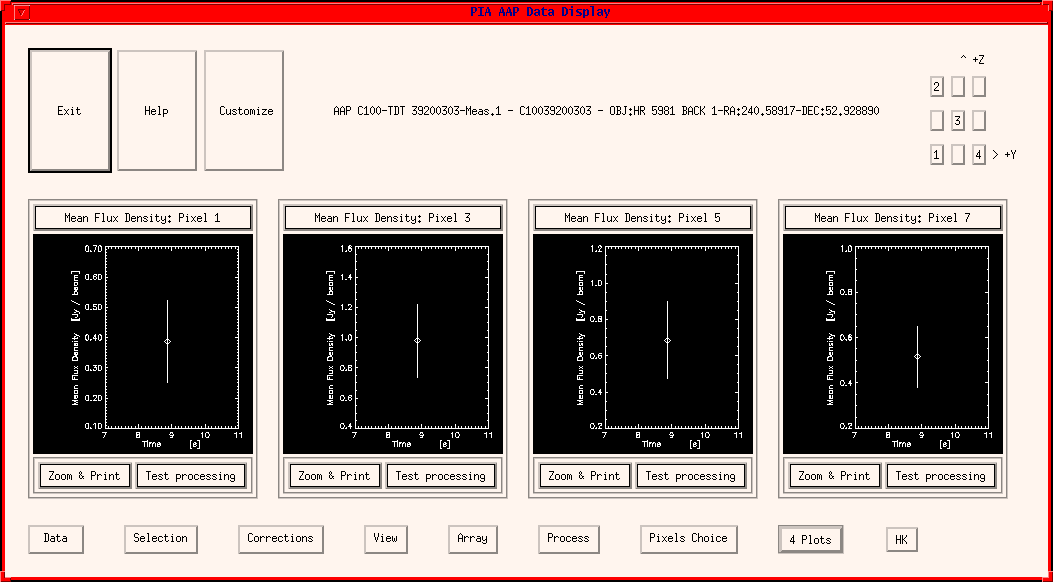
FIGURE 14: The AAP Window (corresponding to a C100 measurement)
- The PIA SPD files contain only one measurement. The Pipeline SPD files may contain several measurements (but only for one detector). For details check the Appendix.
- The PIA AAP refers to only one measurement, but the Pipeline AAR refers to all the measurements of a complete AOT. The Pipeline AAR products are more related to the products which can be obtained by PIA after further processing beyond the AAP level, through the combination of several measurements.
- Background Subtraction (SPD or AAP) [under Process button]:
- Flux Calibration (only SPD level)[under Process button]:
- Assign Astronomical Coordinates (SPD or AAP)[under Correction button]:
- Flat Fielding (AAP - C100/C200 detector data)[under Correction button]:
- Median filtering + background Flat Fielding, as described extensively in section 3.6.2.
- Normalizing with 1st Quartile: a very simple flat-fielding method, based on a computation of the 1st Quartiles of all the individual detector pixels (as representative for their background measurement) and a corresponding normalization. Specially suited for mini-maps, since the other, more sophisticated flat-fielding methods, cannot be applied in this case.
Differences between the Pipeline and PIA Files
The file names and contents for PIA SPD files is different from that for Pipeline SPD files and the same applies to the AAP.Note for PHT-S
Due to the structure of the pipeline files for PHT-S, the data and the reduction must be split into short (SS) and long (SL) wavelength parts, each part of the data having 64 pixels. It is not possible to treat both parts together, except for plotting them together by using "overplot/synchronised".In order to work on PHT-S data one has to load the desired part (SS or SL) explicitly via the menu "Data" (Submenu "Load")!
Correction / Processing Steps
Since the SPD level is not used anymore by normal PIA processing, and most of the correction and processing steps are common to the SPD and AAP GUI we describe them in one shot.The following steps have to / can be performed:
For data reduced in PIA from the ERD stage, internal background subtraction can be performed at the SCP, SPD or AAP levels, while the external background subtraction should be better performed on one of the two last ones (because of possible different responsivities involved). For un-subtracted pipeline SPD files, background subtraction (either internal or external) must be performed here or at the AAP level.
To enter subtraction of background, press the menu button "Process" (submenu "Background Subtraction"). For details see the discussion under SCP reduction. Note that for chopped measurements, where the responsivity is the same for source and background, it is better to subtract the background at the SCP level.
The in-band power is now converted into astronomically meaningful units of Jy or MJy/sr using special calibration files. Press the menu button "Process" (submenu "Extract Flux Density").
This step, necessary for maps, can be performed individually to produce a tentative plot of the coordinates in the data display of the SPD or AAP window. It is also automatically included by the Flux Calibration step. (It reads the Coordinates from the IRPH files. The pointing files are discussed in the ISO IDUM).
Note that for PIA to find the astronomical coordinates, the actual FITS directory at the time of assigning the coordinates must contain the proper IRPH files.
Two methods are offered here for flat-fielding the array data:
NOTE: after applying a flat fielding correction the data
MUST
be saved into the internal buffer (or into a file which should be read
in later) in order that the correction is contained in the buffer measurement
when reading it for map obtention.
Please note that both flat fielding methods described here can be applied
also at the time of producing the map. In this case it is only affecting
the map and not the data structure like in the AAP case.
Astrophysical Applications
This tool helps to combine/display results for presentation. It includes making maps, producing curves of growth, putting together spectra, etc.This chapter gives just a short introduction to what applications are possible and how they can be started. For details the reader is referred to chapter 3.5. Astrophysical Applications Window.
The tool requires the measurements to be available in the AAP buffer, either coming from processing of lower levels or from reading the data from files.
The tool is entered from the PIA Top Window via the menu button "Buffers", submenu "Astrophysical Work". It brings up the Astrophysical Application Window with the following options:
- Multi-Filter Photometry for point sources
- Multi-Filter Photometry for extended sources
- Multi-Aperture Photometry for point sources
- Multi-Aperture Photometry for extended sources
- Spectro-Photometry
- Mapping
- Polarimetry for point sources
- Polarimetry for extended sources
- Show/Correlate Mean Values
- Summary/Print Values
For all Astrophysical Applications options, except for Spectro-Photometry and Mapping (on which the further reduction is performed on a per measurement basis), several measurements are chosen to be combined. The desired measurements will be selected using the measurement selection window you are already familiar with, like for plotting and reducing data at the various stages of reduction.
From every measurement several variables are calculated which yield
a value per variable per measurement.
The main calculated variables are flux and surface brightness per measurement,
accompanied by filter, aperture, polarizer, etc. In the case of a C100
/ C200 measurement, fluxes are obtained by integrating over the full array,
and surface brightnesses are obtained by averaging over the array.
In the case of C100 or C200 measurements a choice of detector pixels
to be used is given. The selected pixels are then used to obtain full fluxes
and brightnesses from the array. Please note that at first at this stage
a PSF correction is applied by data from these detectors.
Additionaly, the possibility of colour corrections is offered
by a menu with two source spectrum alternatives: black-body spectrum (with
a choice of temperature of the BB) and power-law spectrum (with a choice
of its index). If one of the colour corrections is chosen, the calculated
factors from folding source spectrum and filter curve correct the data.
The factors used are presented to the user in a text window.
Note: in case an AAP level measurement contains several chopper plateaux and/or raster positions (eg. a mapping observation, a chopped source vs background observation which has not been background-subtracted, etc.), the average of all elements corresponding to a variable is taken, which is in most cases not meaningful.
Multi-Filter Photometry (for point or extended sources)
The aim is a 2-dimensional plot displaying flux density (point source choice) or surface brightness (extended source) versus central wavelengths of the filters used. The input consists of several measurements at various wavelengths combined as described above. Then the desired plot will be displayed. An example is shown in Figure 15. At the same time a text display/print window pops up, giving the results in table form.
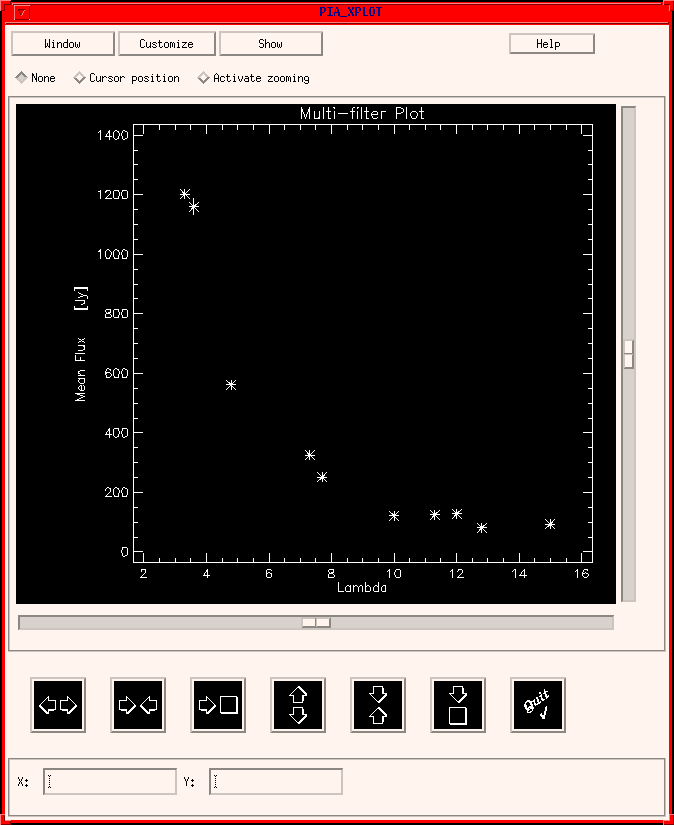
- FIGURE 15: Example for the Multi-Filter
Photometry
Multi-Aperture Photometry (for point or extended sources)
This works the same way as the tool for multi-filter photometry, but generates a curve of growth (flux vs. aperture instead of wavelength).Polarimetry (for point or extended sources)
This works the same way as multi-filter photometry, but plots the flux density against the three angles of the polarizer instead of the wavelength.Show/Correlate Mean Values
By this option the values per variable per measurement, obtained as described above, are then accessible all at the same time for comparisons, plotting, etc. via a special PIA feature (the PIA Show_Structures Menu).Summary / Print Values
This option creates text files, containing the most relevant values from the AAP level, in the form of tables. The text files can be saved and printed.- Select a measurement
- Define the Map Parameters
- Produce Map using spacecraft pointing information. This is the pointing as measured and stored into the IRPH file or
- Produce Map Ignoring Actual Pointing
- Print Map
- Save Map
Spectro-Photometry
This opens a tool for fitting spectral lines and continuum. It works on one AAP level measurement.Mapping
This opens a tool to create maps for raster and dedicated mapping AOTs (e.g. sparse maps PHT17/18/19 and PHT37/38/39, PHT32, or raster observations with P03, P22 and P40).The basic steps are:
This yields an approximated map under the assumption that the spacecraft raster points build a perfectly regular grid.
| Date | Authors | Description |
|---|---|---|
| 04/07/1995 | Ingolf Heinrichsen (MPIK)/Wai MingTai (DIAS) | First Version |
| 08/05/1996 | Martin Haas (MPIA)/Carlos Gabriel (ESA) | General Update |
| 17/03/1997 | Carlos Gabriel (ESA-SAI) | Update |
| 21/04/1997 | Carlos Gabriel (ESA-SAI) | Update |
| 04/06/1997 | Carlos Gabriel (ESA-SAI) | Update (V6.3) |
| 13/02/1998 | Carlos Gabriel (ESA-SAI) | Update (V7.0) |
| 18/08/1999 | Carlos Gabriel (ESA-SAI) | Update (V8.0) |
| 17/03/2000 | Carlos Gabriel (ESA-SAI) | Update (V8.2) |