3.3.6) The PIA signal drifts' modelling
The PHT-Interactive Analysis package offers the possibility of modelling signal transients on the SRD level, i.e. trying to compute the signal the detectors should have measured in cases of not being influenced by response transients. The procedure is based on the signal distribution given and a model describing signal drift behaviour.
This chapter describes the different graphical interfaces for accessing drift modelling, starting parameters, fit results and related data without discussing the different transient models in detail (for a description of the models and the experience gained with ISOPHOT data in this respect, see the internal ISOPHOT document "Investigation of PHT detector transients. Status overview" by J.Acosta et al). Two main interfaces are given, one for procedure setup (functions and parameters), testing and reprocessing individual pixels (PIA Signal drifts modelling [Pixel #]) and one for accessing the full information obtained after drift model fitting to a full measurement, to partly reprocess and accept or reject the results (PIA Drift Analysis Data Display). This can be used for a full review of the results obtained.
Procedure setup, test and processing interface
As in the case of deglitching and drift stability analysis, a testing interface is offered, acting on a single detector pixel, from which several algorithm parameters can be changed, in addition to the election of the model to be used. The parameters chosen are the ones to be used at the time of real data reduction.
The parameters testing interface can be reached from the PHTSRD main window, under the test processing button on every individual plot window. It is labelled PIA Signal drifts modelling [Pixel #]. After pressing this button, the graphical I/F shown in Fig. 1 will pop up. The first time of using it within a PIA session leads to default choices for all the fields.
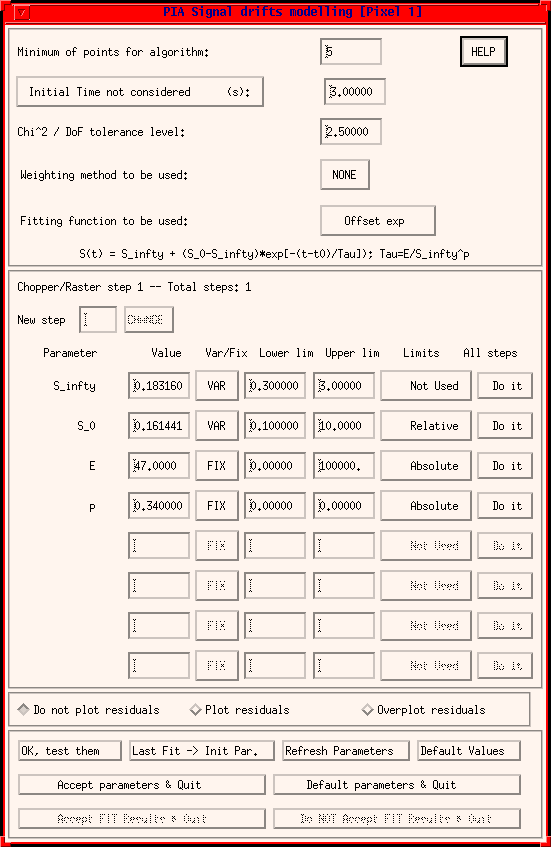
General parameters:
The parameters given in the upper part of the widget represent general choices:
The minimum number of signals required for applying drift modelling.
The Fraction of measurement left out / Initial time not considered, refers to the first part of the distribution in percentage or in absolute time, which is ignored at the time of approximating the distribution with a model. The reason for leaving a first part out is that some PHT detectors show a hook response behaviour after starting the measurement, leading to a hook in the signal distribution, which is very difficult to include in a drift model.
The Chi^2/DoF tolerance level is the limit imposed for acceptance of a good fit to the data. When reducing a full measurement to the SCP level applying drift modelling, the results of a fit exceeding this level will (in the standard case) not be taken into account for the computation of the signal per chopper plateau. This parameter has no influence at the time of testing, but at the time of processing a full measurement.
The Weighting Method to be used refers to the weight every point gets at the time of calculating the fitting Chi-square. Default is NONE, thus all signals get the same weight. Options are the inverse of the single uncertainties squared (labeled SIGMA, w=1/sigma^2), giving larger weights to the initial signals (labeled TIME, w=exp[-t]), and giving larger weights to lower signals (labeled SIGNAL, w=1/signal).
Under Fitting function to be used several functions can be found:
Whenever the function is changed, the function is given in a label below the function button and start parameters are calculated,as described below. Default values for function and general parameters are defined, per detector, reflecting the actual status of the PHT calibration on this field.
Functions parameters:
The starting parameters are calculated for function and pixel specifically chosen. The name of the parameter is given in the first column and corresponds to the nomenclature in the function window (please note: S_infinity = S_final). In most cases the starting parameters depend on the signal distribution, thus they are different for different distributions (e.g. different pixels of same measurement). The parameters can be changed by the user (column labeled "Value"), and also be fixed to a default value (Var/Fix column). Nevertheless, parameters which are fixed can be different for different pixels. For instance, in the case of the Fouks function, if Beta is fixed for a certain pixel, this means that for the overall fit the Beta value for other pixels is fixed to a pre-determined value, given by the PHT calibration (the numbers are taken from ASCII files "function-name"_par.txt in the CALG directory).
Limits can be given for the variation of every parameter (Lower lim / Upper lim). The limits can be switched off (Not used), taken relative to the starting value (Relative) of taken as an absolute interval (Absolute). A limit violation is flagged. The standard case does not accept the results coming from such a fit. However, the user has the possibility of ignoring the flags and accepting all fitted values, as is explained below, by the PIA Drift Analysis Data Display.
In the case of a raster and / or chopped measurement, an indication of the step is given above the function parameters for which the parameters are derived and applied. By default the choice is on the first raster / chopper step, but this can be changed by using the new step text window situated directly below. To set any parameter to the same value for all raster/chopper steps, use the button Do it on the right side of every parameter row, under the label All Steps.
Plotting Residuals:
An intermediate row to select plotting of residuals is located between the Function parameters and Action windows. When testing is applied a plot of signal and model pops up. Residuals from this fitting can be plotted separately or overplotted to the signal distribution.
Action buttons:
The eight buttons at the bottom of the widget are action buttons, similar to other PIA parameters testing interfaces:
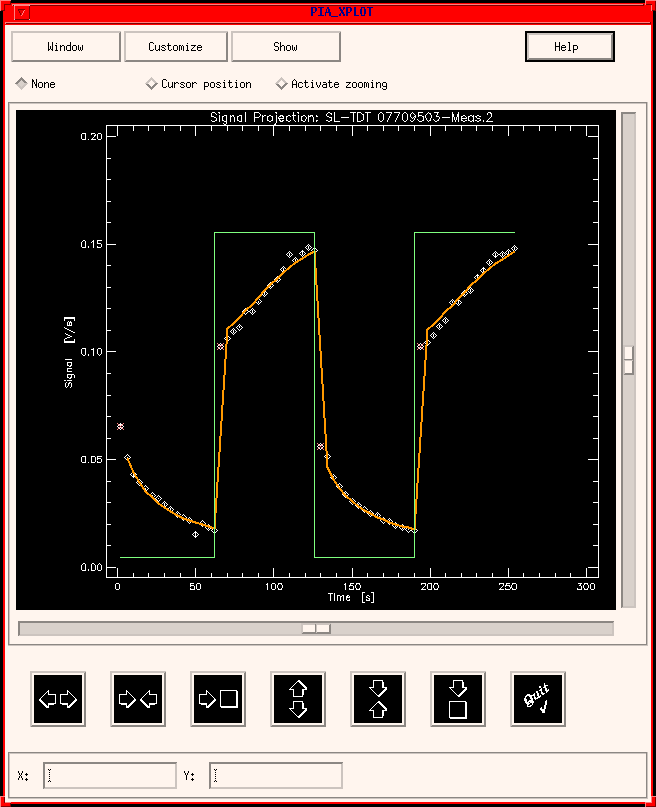
FIGURE 2: Signal drifts fitting results
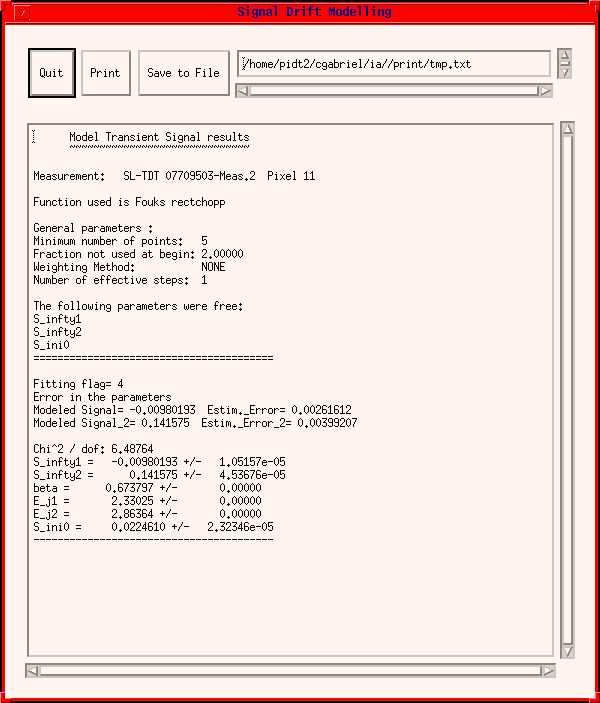
FIGURE 3: Single Pixel Drift modelling log
Reducing data to SCP using signal drift modelling
When reducing data from SRD to SCP level, a choice for drift handling is offered. If chosen, the menu given by Figure 3a pops up.
FIGURE 3a: The drift handling choice window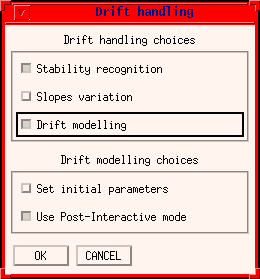
The different drift handling choices include stability
recognition, slopes variation analysis (which is at the moment implemented
only for use by the calibration scientists) and drift modelling. If
the latter is active, sub-choices become also active, for setting (re-setting)
initial parameters, like function, fixed and variable parameters, etc.,
(as described basically above by the testing interface)
and for using the Post-interactive mode, described by the PIA Drift
Analysis Data Display Window.
When the drifts modelling option has been activated, the signal distributions are fitted, pixel by pixel and chopper plateau by chopper plateau. Prior to this averages and medians per chopper plateau are obtained, in the so called standard analysis, using the stability recognition or not according to the drift handling choice made (none of the drift handling and modelling choices as made by the drift handling choice window is exclusive). The initial parameters for drift modelling, including the modelling function can be set by selecting Set initial parameters, otherwise the default values will be taken. Note that default values can also be changed when using the testing interface described above.
For those fits which are succesful, the fitted final signals of the distributions per chopper plateau will overwrite the averages per chopper plateau, which are used further in the data reduction chain. Succesful means in this case, according to the criteria of maximal Chi-square per degree of freedom accepted and for accepted range of fitted parameters .
If the option Post-Interactive mode is chosen, the decision on using the values from drift modelling and how, is confined to the main window (described below) PIA Drift Analysis Data Display .
While only the main parameters used for drift modelling are written into the measurement's header, complete information about the application of drift modelling can be recalled via a button located both in the SCP main window and in the PIA Drift Analysis Data Display window under View -> Drift modelling Stats. The text obtained can be sent to the printer or filed for documentation purposes.
PIA Drift Analysis Data Display Window
If the option Post-Interactive mode by Drift Modelling is chosen, the full drift modelling information is kept in buffers, waiting for confirmation to be used. The quality of the drift modelling applied to the data can be examined, pixel by pixel, accessing all the relevant information to this mode (like Chi-squares, residuals, etc.), to decide if the fit is accepted or not. This mode includes also the possibility of re-processing single pixels with different parameter selection. This is the reason for calling this mode Post-Interactive.
All the data can then be accessed in an intermediate level between SRD and SCP, via a main window (PIA Drift Analysis Data Display), shown in Figure 4, which is similar to those used for every main level.
The default plots for multi-pixel detectors are given by the signal per ramp distribution of different pixels, where the model signals and final values per chopper plateau are overplotted as for single pixel testing (Figure 3). In addition signal flags, derived signals, flags from derived signals, standard averages per chopper plateau, Chi-squares and residuals can be plotted (by clicking into the horizontal bar over each graphical screen). For a special case (Fouks function for chopping mode) also the final signals (predicted from the signal jumps at the beginning of a chopper plateau) can be accessed.
As on every level a button below the plotting windows allows for zooming and printing. Besides a button is offered for reprocessing the single pixel. When this button is pressed, it activates a single pixel re-processing window, which is basically the same used for testing, as described by Testing and individual pixel processing I/F, at the beginning of this chapter (certain buttons are disabled, like function selection, whereas those related to the final acceptance of model results are enabled).
The upper row of buttons have the same meaning as for the other main level windows with the exception of the Exit button giving different alternatives, the same as described below for the Process button by the description of the function buttons.
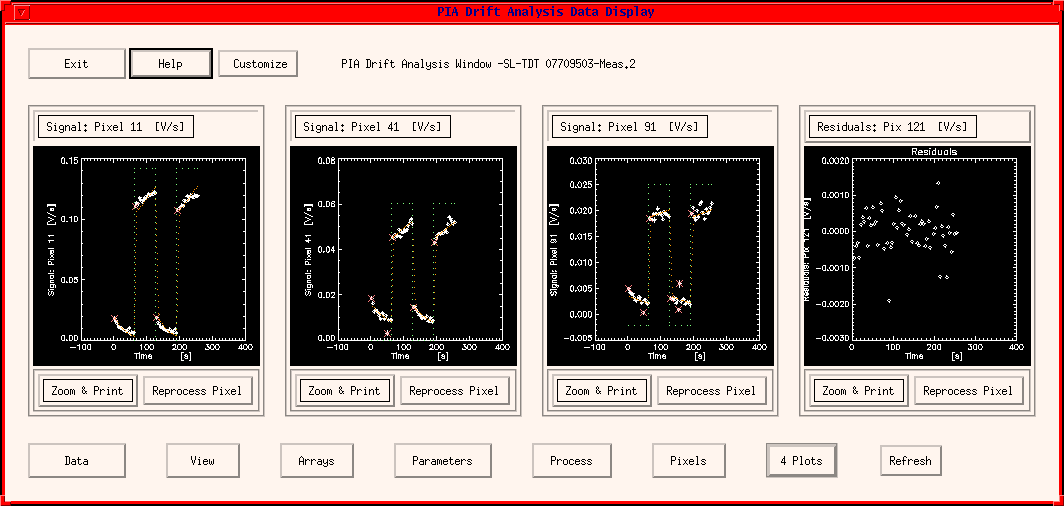
FIGURE 4: The PIA main Drift Analysis Window
The lower part of the main drift analysis window shows as usual a series of buttons related to the full measurement on the level for accessing different functions. The buttons and their functions are:
- Data: all the buffer contents
on this (intermediate) level can be accessed using the PIA Show
Structure facility (Show Data option). The buffer contents can be also
saved (Save option) to an internal PIA file for further handling.
- View: access to general information,
like Compact Status, Header, Instrument Station report and specially to
statistics information collected during drift modelling, drift
stability analysis and slopes variation analysis. The latter two are
only accessible if the processing from SRD to SCP included them. The
full information on a text window is accompanied by its access via the
PIA Show Structure facility.
- Arrays: this button gives access
to a menu for plotting (or overplotting) the arrays corresponding to the
final signals per pixel, corresponding to drift modelling, standard analysis
and, in cases wheref Fouks function for chopping mode is used, also to the predicted
final signals derived from the jumps between chopper plateaus. If the measurement
was performed in raster or chopped mode, a menu for choosing the desired
combination pops up, as given in Figure 5. Giving
information on the maximal possible choices on both raster point and chopper
steps / plateaux, it allows for choosing averages per chopper step (same
position measured several times) or signals per single chopper plateau.
- Parameters: plotting/overplotting
function parameters' distribution is possible from this button. If applied,
a choice per Raster Point and Chopper Step/Plateau described in the former
point is asked for.
- Process: this button gives the same alternatives as the Exit button on top of the main window. There are three alternatives:
- Accept modelling in standard way: the criteria for accepting / rejecting fit values apply, like maximal tolerated Chi-square per degree of freedom and accepted ranges for a given fitting parameter. The accepted fit values are used for overwriting the corresponding Averages per chopper plateau on the SCP level,
- Accept all values from modelling: the values obtained from modelling are all accepted (overwriting all Averages per chopper plateau on the SCP level),
- Discard all values from modelling: they are all rejected (leaving
the results from the standard analysis without drift modelling)
- Pixels: for accessing data from
other pixels on the drawing windows.
- # Plots: for changing the
number of drawing windows between 1 and 4.
- Refresh: this button should be used after re-processing of a single pixel for refreshing the corresponding data on the drawing window. Anyway, if not used, any action on the main window following a single pixel reprocessing will update the drawing windows.
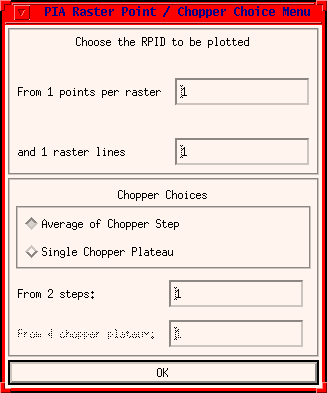
FIGURE 5: The Raster Point / Chopper Choice menu
General Warning:
While it is well recognized that signals drifts are one of the factors limiting photometry and calibration accuracy, experience with drift modelling of ISOPHOT data still needs to be gained.
Thus, this capability within PIA shall be used taking care of parameters, inspecting all results and putting a healthy scepticism on values and uncertainties resulting from modelling.
References:
[Schub1] : Schubert,J., Fouks,B.I., Lemke,D., Wolf,J, "Transients Response of ISOPHOT Si:Ga Infrared Photodetectors: Experimental Results and Application of the Theory of Nonstationary Processes", SPIE 2553, 461.
| Date | Author | Description |
|---|---|---|
| 03/09/1996 | Carlos GABRIEL (ESA/VILSPA-SAI) | First Version |
| 03/03/1997 | Carlos GABRIEL (ESA/VILSPA-SAI) | Update V6.1 |
| 06/06/1997 | Carlos GABRIEL (ESA/VILSPA-SAI) | Update V6.3 |
| 15/10/1997 | Carlos GABRIEL (ESA/VILSPA-SAI) | Update V6.5 |