SWS06 was used to make observations over a wider wavelength
range, as opposed to observing individual lines. Up to 64 wavelength
ranges could be chosen anywhere in the SWS grating range, i.e., between
2.38 and 45.2![]() m, under the restriction that each range falls
within one of the bands (see Table
2.1).
m, under the restriction that each range falls
within one of the bands (see Table
2.1).
SWS06 was executed by pointing the telescope to the target position, and then for each wavelength range (or pair of merged ranges) a dark-current measurement was done. If the spectral scan was long enough to need it, a measurement on the reference wavelength was performed. The wavelength range specified in the AOT was observed. Each range was scanned back and forth to provide redundancy. The reference measurement (if any) was repeated after which again a dark current was done. Very long observations were interrupted by wavelength switching to the reference wavelength, as an additional photometric check. If a single up and down scan did not provide enough sensitivity, the measurement sequence was repeated as often as necessary. Photometric checks using the internal calibrator were done at regular intervals, at least once per AOT.
Table 3.3 shows the reset interval, dwell times, stepsize and number of up-down scans for SWS06. The dwell time stops at 4 secs, and for higher sensitivity the scans were repeated. This was not always the case. Earlier versions of the logic (prior to May 1996, see Appendix C) had the dwell time increasing.
| Detector | reset | dwell | stepsize | Number of |
| band | interval | time | LVDT | up-down |
| [s] | [s] | scans | ||
| 1 | 1, 2, 4 | 1, 2, 4 | n | |
| 2, 3 | 1, 2 | 1, 2, 4 | n | |
| 4 | 1, 2 | 1, 2, 3, 6 | n |
Example of an SWS06 observation:
As an example, an SWS06 observation around 10, 12, 33
and 40![]() m had the following timeline:
m had the following timeline:
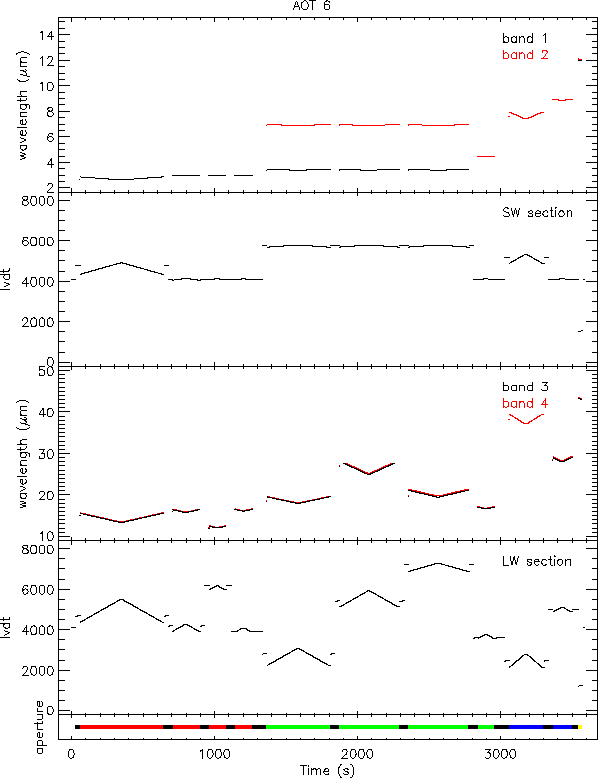
Figure 3.9 shows the wavelength layout and grating
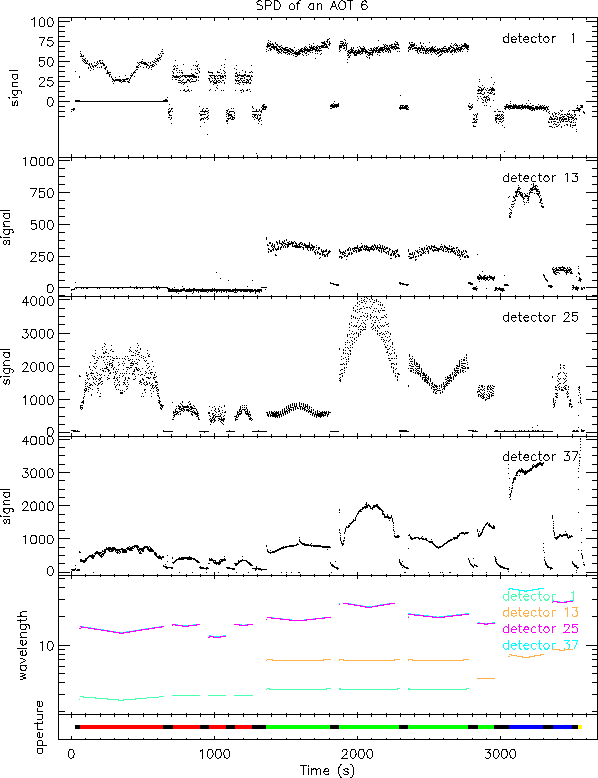
positions in both grating sections. Figure 3.10 shows
the SPD signals, status data, grating position and wavelength for detectors
1, 13, 25 and 37 during an SWS06 observation.
The SPD
data is in ![]() V/s. The periods when apertures 1, 2 and
3 are used, times of dark current
measurements and photometric
checks are indicated.
V/s. The periods when apertures 1, 2 and
3 are used, times of dark current
measurements and photometric
checks are indicated.
Figure 3.11 shows the AAR, flux (in Jy) against wavelength, for the same observation (upper panel). What can be achieved after further processing of such data in either ISAP or OSIA is shown in the lower panel.

|

|