SWS01 was designed to perform a quick scan over the entire SWS spectral range to get the broad continuum shape of the object under study. It could scan at one of four user-selected speeds, resulting in four possible durations for the AOT. The scans are effectively continuous, using small and frequent steps, and on a time scale much shorter than the selected reset interval of the detector pre-amplifiers. The integration in time translates into a smoothing of the spectrum, which prevents aliasing problems due to insufficient sampling. It was accepted that the spectral resolution it could achieve, would be lower than nominal. The degradation of resolution with respect to the full resolution provided by AOT SWS02 is a function of wavelength and source structure. Table 3.1 gives approximate average values for this resolution degradation. See Section 4.5.1.2 for further discussion.
Table 3.1 shows the reset intervals, dwell times, stepsize and number of up-down scans for SWS01. The reset interval is the time between detector resets, the dwell time is the time during which the grating does not move (and hence each detector is seeing a fixed wavelength) and the stepsize, in LVDT, is the amount by which the grating moves every dwell time. An LVDT is an internal unit of measurement of the grating position and is given the name because it is measured by a Linear Voltage Differential Transducer. A movement of 1 LVDT corresponds to approximately 1/8 of a resolution element.
| Speed | Duration | Reset | Dwell | Stepsize | Number of | Pipeline |
| interval | time | LVDT | up-down | resolution | ||
| [s] | [s] | [s] | scans | degradation | ||
| 1 | 1172 | 1 | 1/8 | 4 | 1 | |
| 2 | 1944 | 2 | 1/8 | 2 | 1 | |
| 3 | 3846 | 2 | 1/8 | 1 | 1 | |
| 4 | 6570 | 2 | 1/4 | 1 | 1 |
For an SWS01 measurement, where the grating moves during a reset interval, the grating position in the SWSPGPOS field of the SPD is set to the start position of the grating during the reset interval. This contrasts with the wavelength in the SWSPWAVE field of the SPD which is the effective wavelength, i.e. calculated for the grating position averaged over the valid samples.
Example of an SWS01 observation:
The timeline of an SWS01 observation using the fastest speed 1 was as follows:
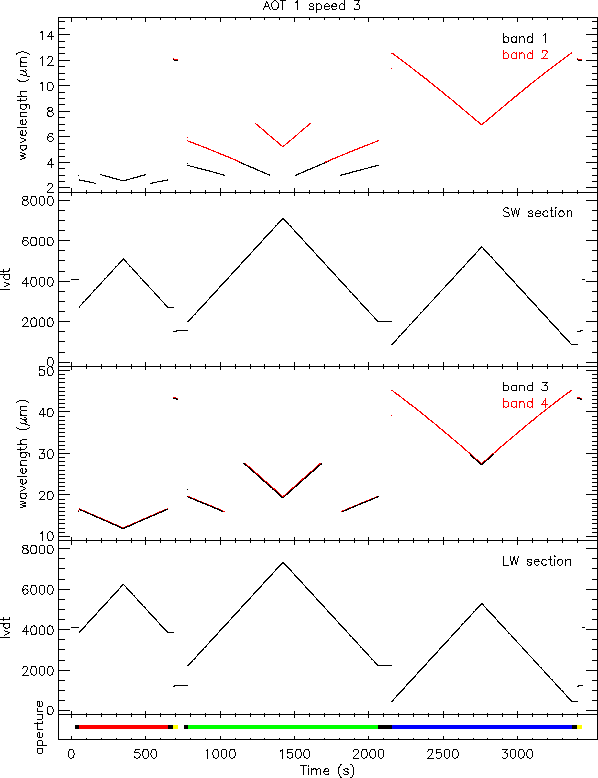
Figure 3.2 shows the layout of an SWS01 speed 3 ERD. It displays how the complete wavelength range is covered in time by the 4 grating bands. It also shows the relation between the LVDTs in the SW/LW sections, the wavelengths and the selected apertures (in the bottom panel). The nature of up-down scans (see Section 3.2.1) can be seen clearly. The periods when apertures 1, 2 and 3 are used, times of dark current measurements and photometric checks are indicated in colours at the bottom: red, green and blue for apertures, black for dark and yellow for the photometric check.
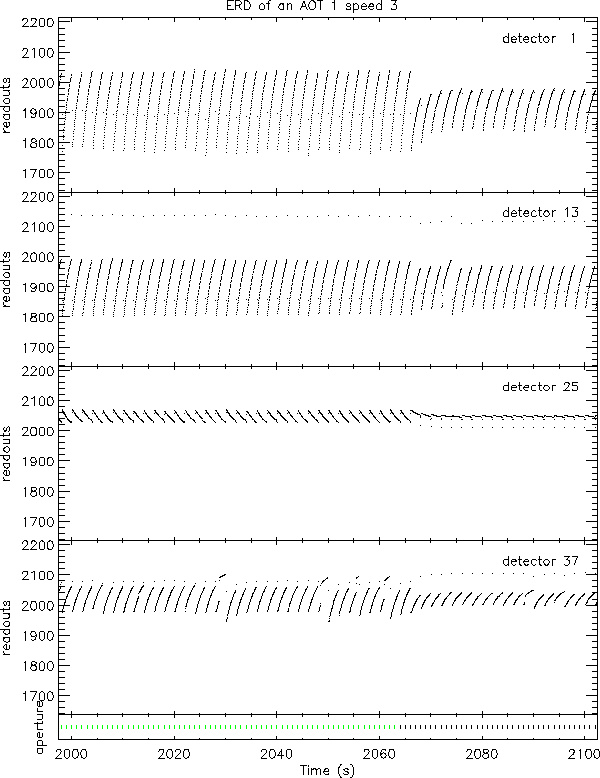
Figure 3.3 shows only a small fraction of the ERD data for detectors 1, 13, 25 and 37 (bands 1, 2, 3 & 4) of the same SWS01 observation. The signal is shown in bit values against time (ITK).
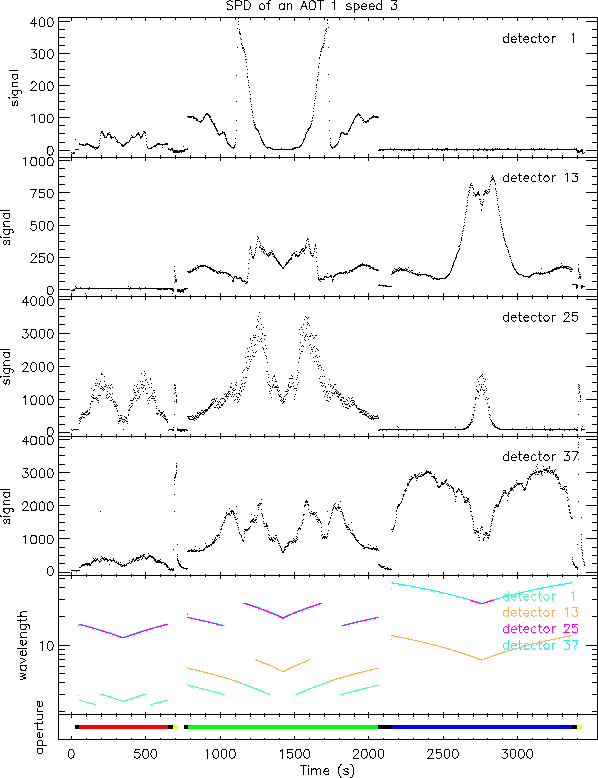
Figure 3.4 shows SPD data, in ![]() V/s, for
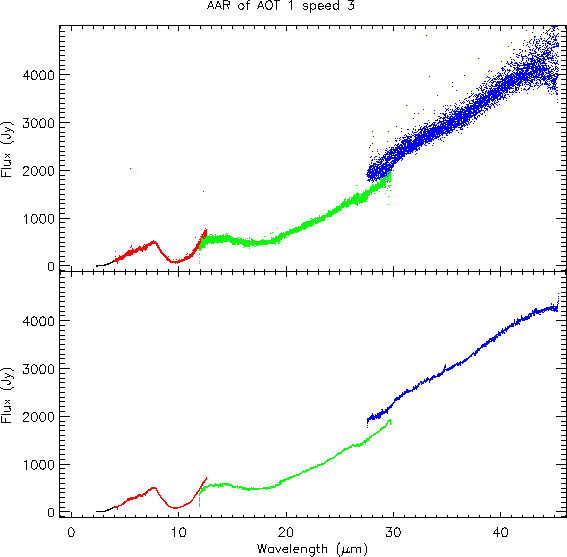
detector 1 of each band against time. Figure 3.5 shows
the AAR
for the same observation, now as flux (Jy) against wavelength (upper panel).
The spread of flux between different detectors in the same band can be
seen in
the band 4 data. In the lower panel it is shown what further processing
can achieve.
V/s, for
detector 1 of each band against time. Figure 3.5 shows
the AAR
for the same observation, now as flux (Jy) against wavelength (upper panel).
The spread of flux between different detectors in the same band can be
seen in
the band 4 data. In the lower panel it is shown what further processing
can achieve.
|
|