

Next: 2.3 Focal Plane Scale
Up: 2. Instrument Description
Previous: 2.1 Introduction
2.2 Overview
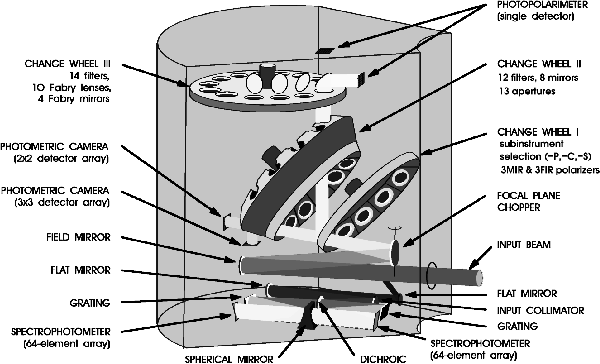
Figure 2.1:
Schematic view of the PHT instrument. After passing the field
mirror and the focal plane chopper the light beam coming from the
telescope reaches change wheel I, which allows for the choice of one of
the various sub-instruments and the polarimetric observing mode.
The dual channel design of the PHT-S sub-instrument is indicated in the
lower part of the drawing by showing the dichroic element and the two
PHT-S detector arrays. Both PHT-C detectors are illuminated via change
wheel II, which contains the filters for these sub-instruments. This
wheel also carries the apertures for the PHT-P photometers. Finally,
change wheel III contains the filters for the PHT-P sub-instruments. The
fine calibration sources and the third PHT-P detector have been omitted
for clarity (see also Figure 2.2).
|
|
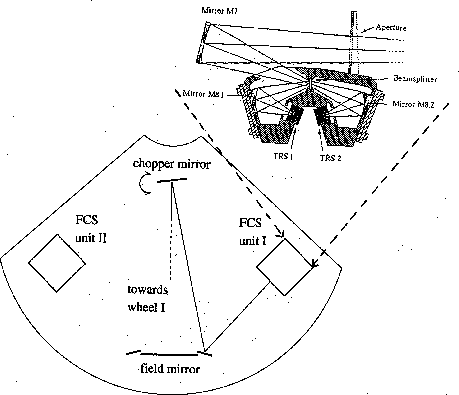
Figure 2.2:
Schematic view of the PHT instrument set-up for calibration
measurements with the internal fine calibration sources (FCSs).
Each FCS contained two thermal radiation sources (TRS).
Tuning of the heating currents of the TRS elements in combination with
the beam splitter allowed to match a wide range of calibration fluxes.
|
|
ISOPHOT, or PHT, was composed of 3 subsystems, or sub-instruments,
optimised for specific photometric modes. Only one sub-instrument
could be used at a time. The sub-instruments were:
- PHT-P, a multi-band, multi-aperture photometer with
three single detectors covering the wavelength
range 3 - 120
 m from the near-infrared (NIR) to the
far-infrared (FIR).
- PHT-C, two photometric far-infrared (FIR) cameras for the
wavelength range 50 - 240
 m.
m.
- PHT-S, two grating spectrophotometers, operated
simultaneously, for the wavelength ranges of
about 2.5 - 5
 m and 6 - 12
  m.
m.
The modular subsystem concept minimised the number of mechanisms
and resulted
in a compact and rigid instrument. By appropriately setting three ratchet
wheels a certain observational set-up could be selected from a large
choice of useful combinations of filters and apertures.
Figure 2.1 shows a schematic view of the instrument.
For a more detailed description of the cryo-mechanics
see Lemke et al. 1993, [35].
A focal plane chopping mirror was included for beam switching and
modulation within the field of view of the instrument (Lemke et al. 1993,
[35]).
For absolute photometric measurements, the fine calibration sources (FCSs)
were used as standard reference sources.
In addition, PHT was equipped with two sets of three polarisers,
one set for the PHT-P detector group and one for the PHT-C detectors,
covering the whole wavelength region from 3 to 240 m. During
the mission polarisation observations were only done at 25
 m
and 170
 m.
m.


Next: 2.3 Focal Plane Scale
Up: 2. Instrument Description
Previous: 2.1 Introduction
ISO Handbook Volume IV (PHT), Version 2.0.1, SAI/1999-069/Dc


![]() m. During
the mission polarisation observations were only done at 25
m. During
the mission polarisation observations were only done at 25![]() m
and 170
m
and 170![]() m.
m.