3.4.2) The PIA Printer Definition Window
Before printing a plot, it is necessary to define the printer configuration using the Printer Definition Window of PIA. The configuration is then used for all further prints as long as it is not modified.
The Printer Definition Window is called from various places within PIA, e.g. when applying for "Define Printer" in the PIA Xplot Window or for "Customize Printer" in the PIA Main Window.
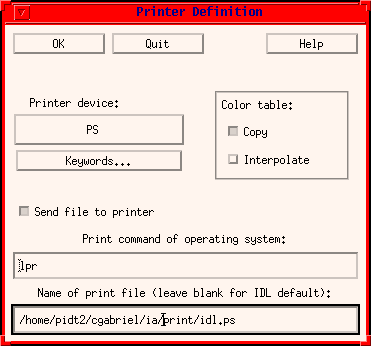
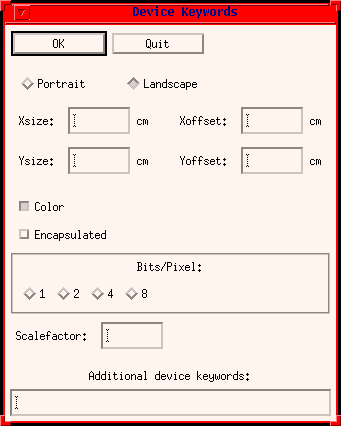
This chapter describes the features and items of the PIA Printer Definition Window shown in Figure 1 and its associated PIA Device Keywords Window shown in Figure 2.

FIGURE 1: The Printer Definition Window
The items are as follows:
OK: confirms the new setting and exits the window.
Quit: exits the window without confirmation, it will keep the printer set-up unchanged.
Printer Device: The type of printer that is used. It is displayed on the pull-down button (PS in Figure 1). The following printer devices are supported:
- CGM - Computer Graphics Meta File
- HP - Hewlett-Packard Graphics Language HP-GL
- LJ - Digital Equipment LJ250
- NULL - No Graphics output
- PCL - Hewlett-Packard Printer Control Language
- PS - Postscript
- REGIS - Regis Graphics Protocol
- SUN - SunView Windowing System
- TEK - Tektronics compatible terminal
- X - X-window system
- Z - Z buffer pseudo device
The default for the printer device type is postscript (PS).
Keywords: brings up the PIA Device Keywords Window shown in Figure 2 for the specification of details related to paper size and printing resolution.
Colour Table: The radio buttons toggle between using a copy of the PIA colour table or interpolate a new colour table specifically for the selected device.
Send file to printer: This button selects whether the output shall be sent directly to the printing device indicated below or whether only a file shall be produced for later printing or inclusion in documents.
Print Command of Operating System: Enter the print command used by the operating system under which you run PIA. For UNIX this is usually: lpr - Pxxxxxx, for VMS: PRINT/NOTIFY/QUEUE=xxxxxx, where xxxxxx is the printer queue.
Name of Print File: Enter the filename to which the output is sent. Subdirectories may be specified in the syntax adequate to your operating system VMS/DCL or UNIX. The default directory is specified by the PIA_PRINTDIR setting of the environment.
The Device Keywords Window
It is shown in FIGURE 2.

FIGURE 2: The Device Keywords Window
After the keyword set-up process is finished use the OK button to confirm the new setting and the Quit button to leave the Device Keywords Window and to return control to the Printer Definition Window, which was disabled after the Device Keywords Window had been started. A Quit without confirmation via OK will leave the printer keyword set-up unchanged.
The items are as follows:
OK: confirms the new keyword set-up and exits the window.
Quit: exits the window without confirmation, it will keep the keyword set-up unchanged.
Paper Format: The radio buttons toggle between Portrait and Landscape format,
Xsize, Ysize and Xoffset, Yoffset: The numerical input fields allow specification of the exact paper size in cm (default is A4) and the distance from the edge of the page respectively.
Colour: This selection activates a colour output, provided it is supported by the printing device. If the button is not activated, the output will be black and white.
Encapsulated: If this button is selected the print file will be in encapsulated format, i.e. it can be included in documents, with the possibility of having the word processor change the format, i.e. the size of the print-out.
Resolution: The radio buttons labelled 1-8 under the topic Bits/Pixel allow the user to influence the resolution by which the bit-pattern on the screen is converted into the pixel size of the output unit.
Scalefactor: Since the actual size of the output on the final paper is printer hardware dependent this numerical input field allows the scale of the plot/printout to be adapted.
Chapter history:
Date Author Description 04/07/1995 Ingolf Heinrichsen (MPIK) / Wai Ming Tai (DIAS) First Version 16/05/1996 Martin Haas (MPIA) General Update 07/03/1997 Carlos Gabriel (ESA/VILSPA - SAI) Update 10/06/1997 Carlos Gabriel (ESA/VILSPA - SAI) Update (V6.3)